My 2025 OSCP Journey Part 2 : Information Gathering
Introduction
สวัสดีคุณผู้อ่านทุกท่านครับ
ยินดีต้อนรับทุกท่านกลับเข้าสู่ Blog series ของผมอีกครั้ง หลังจาก Part แรกที่เราได้พูดถึงเรื่องพื้นฐานส่วนใหญ่ในด้านความมั่นคงปลอดภัยทางไซเบอร์ และ ข้อมูลโดยรอบอื่นๆ อาทิเช่น อะไรคือ Offsec Pen-200?, การสอบ OSCP แนวคิดหลักสามประการ ในด้านความมั่นคงปลอดภัยทางไซเบอร์
สำหรับคุณผู้อ่านท่านใดที่หลงเข้ามาใน Part นี้เป็นที่แรก ตัวผมนั้นภูมิใจและแนะนำเป็นอย่างยิ่ง ที่จะให้คุณผู้อ่านได้อ่าน Part 1 ก่อนเป็น Part แรกตาม Link นี้เลยครับ: https://safecloud.co.th/researches/blog/My-2025-OSCP-Journey-Part-1 และ Welcome to My Journey ครับผม
ใน Part ที่ 2 จะมีเรื่องอะไรรออยู่บ้าง ตัวผมนั้นยินดีเป็นอย่างยิ่งที่จะเล่าให้ฟังครับ เพื่อไม่เป็นการเสียเวลาไปมากกว่านี้ เพราะฉะนั้น Enjoy ครับ (Spoiler!!: เนื่องด้วยใน Part นี้เราจะมีการพูดเรื่องในเชิง Technical ผมจึงจะมีการแนบ Cheatsheet ไว้ในช่วงท้ายของ Blog ด้วย หวังว่าเราจะได้พบกันที่นั่นนะครับ)

Diving Into the Technical: Information Gathering
หลังจากที่เราได้พูดเรื่องพื้นฐานของโลก Cybersecurity ทั้งหมดแล้ว ก็ได้เวลาเข้าสู่พื้นที่ของ Technical ของคอร์ส OffSec Pen-200 ครับ
ขั้นแรกที่สำคัญของวงจรการทดสอบการเจาะระบบนั้นคือ Information Gathering(การหาและเก็บข้อมูล) ในขั้นตอนนี้จะเป็นขั้นตอนที่ผู้ทำการทดสอบ เก็บข้อมูลเกี่ยวกับสภาพแวดล้อมของเป้าหมายเพื่อระบุช่องโหว่ พื้นที่ที่จะทำการโจมตี และวางแผนในการโจมตี The Penetration Testing Lifecycle(วงจรการทดสอบการเจาะระบบ) การหาและเก็บข้อมูล(Information Gathering)เป็นเพียงส่วนเดียวในระบบวงจรของการทดสอบการเจาะระบบ และนี้คือขั้นตอนทั้งหมดโดยสังเขป:
- Defining the Scope: ระบุขอบเขตของการทำการทดสอบอย่างชัดเจน ระบุเป้าหมาย ระบุกฎเกณฑ์ รวมถึงกฎเกณฑ์ทางด้านกฎหมายเช่นกัน
- Information Gathering: เก็บข้อมูลโดยวิธีการทางตรง(Active) หรือทางอ้อม(Passive) หรืออื่นๆเพื่อระบุจุดโจมตีที่เป็นไปได้
- Vulnerability Detection: วิเคราะห์ข้อมูลที่เก็บได้และระบุจุดอ่อนภายในระบบหรือแอปพลิเคชัน
- Initial Foothold: ใช้ประโยชน์จากช่องโหว่ที่พบเพื่อให้ได้สิทธิ์การเข้าไปภายในระบบโดยไม่ได้รับอนุญาต(unauthorized access)
- Privilege Escalation: เพิ่มสิทธิ์การเข้าถึง เพื่อเพิ่มประสิทธิภาพและผลกระทบของการโจมตีภายในระบบ
- Lateral Movement: กระจายสิทธิ์การเข้าถึงเพื่อเข้าถึงหรือโจมตีข้ามเครื่อข่ายเพิ่มเติม
- Reporting/Analysis: เขียนรายงานสิ่งที่พบ รวมถึงวิธีการ ข้อแนะนำในการแก้ไขและรับมือ
- Lessons Learned/Remediation: ทบทวนขั้นตอน ระบุช่องโหว่ และพัฒนาความปลอดภัย
เราจะมาเริ่มที่การหาและเก็บข้อมูล(Information Gathering)กันก่อน ซึ่งเป็นรากฐานของขั้นตอนต่อๆไป ซึ่งการหาและเก็บข้อมูลนั้น สามารถแบ่งออกได้เป็น 3 ประเภทหลักๆ:
- Passive Information Gathering(การเก็บข้อมูลโดยวิธีการทางอ้อม)
- Active Information Gathering(การเก็บข้อมูลโดยวิธีการทางตรง)
- LLM-Powered Information Gathering(การเก็บข้อมูลโดยใช้LLMs[Large Language Models])
Passive Information Gathering(การเก็บข้อมูลโดยวิธีการทางอ้อม)
การเก็บข้อมูลโดยวิธีการทางอ้อมคือการเก็บข้อมูลโดยไม่ได้มีการโต้ตอบ(non-interacting)หรือยุ่งเกี่ยวกับเป้าหมายโดยตรงกล่าวคือเป็นการเข้าถึงเพื่อหาข้อมูลโดยไม่มีการบุกรุก(non-intrusive)เพื่อทำให้โอกาสการโดนตรวจจับต่ำหรือน้อยที่สุดระหว่างการหาข้อมูลที่มีค่านั่นเอง
โดยที่วิธีทั่วไปและพบได้บ่อยมีดังนี้:
- Whois Enumeration: เปิดเผยชื่อเจ้าของ Domain, รายละเอียด Registration, และ ข้อมูลการติดต่อ(Contact Information)
- Google Hacking: ใช้วิธีการค้นชั้นสูงเพื่อเปิดเผย Credentials(ข้อมูลรับรอง), Login pages, หรือ ไฟล์ที่userไม่ควรจะเห็นโดย google misconfigured files indexed
- Netcraft: เปิดเผยข้อมูลทางเทคโนโลยีของเป้าหมาย ประวัติ หรือการตั้งค่าของเซิฟเวอร์
- Open-Source Code: วิเคราะห์ Code ที่เป้าหมายเปิดเผยในที่สาธารณะ เพื่อหาช่องโหว่
- Shodan: ใช้ในการค้นหาและเปิดเผยการเชื่อมต่ออินเตอร์เน็ตระหว่างอุปกรณ์และการให้บริการ(Device and Services) เช่น IoT device และกล้อง
- Security Header and SSL/TLS: ตรวจสอบ HTTP headers และ การตั้งค่าของ SSL/TLS เพื่อหาช่องโหว่ อาทิเช่น ใบรับรองที่หมดอายุหรือช่องโหว่อื่นๆ(e.g. CSP, HSTS)
kali@kali:~$ whois cybertechlabs.com -h 192.168.50.251
   Domain Name: CYBERTECHLABS.COM
   Registry Domain ID: 2025123456_DOMAIN_COM-VRSN
   Registrar WHOIS Server: whois.namecheap.com
   Registrar URL: http://www.namecheap.com
   Updated Date: 2023-07-10T14:22:11Z
   Creation Date: 2016-07-10T14:22:11Z
   Registry Expiry Date: 2026-07-10T14:22:11Z
   Registrar: NameCheap, Inc.
   Registrar IANA ID: 1068
   Registrar Abuse Contact Email: abuse@namecheap.com
   Registrar Abuse Contact Phone: +1.6613102107
   Domain Status: clientTransferProhibited https://icann.org/epp#clientTransferProhibited
   Name Server: NS1.CYBERTECHLABS.COM
   Name Server: NS2.CYBERTECHLABS.COM
   DNSSEC: unsigned

Registry Registrant ID:
Registrant Name: Dr. Ethan Carter
Registrant Organization: CyberTech Labs
Registrant Street: 42 Quantum Ave Registrant
City: San Francisco
Registrant State/Province: California Registrant
Postal Code: 94105 Registrant
Country: US
Registrant Phone: +1.4156789012
Registrant Email: ethan.carter@cybertechlabs.com

Registry Admin ID:
Admin Name: Michael Donovan
Admin Organization: CyberTech Labs
Admin Street: 42 Quantum Ave
Admin City: San Francisco
Admin State/Province: California
Admin Postal Code: 94105
Admin Country: US
Admin Phone: +1.4156789023
Admin Email: michael.donovan@cybertechlabs.com
.
.
.
Codeblock 1: ตัวอย่างการใช้ Command whois บน cybertechlabs.com
ข้อได้เปรียบ:
- ไม่มีการบุกรุก
- ลดโอกาสที่จะโดนตรวจจับ
Active Information Gathering(การเก็บข้อมูลโดยวิธีการทางตรง)
การเก็บข้อมูลโดยวิธีการทางตรงคือการเก็บข้อมูลโดยมีการตอบโต้(interacting)หรือยุ่งเกี่ยวกับเป้าหมายโดยตรงเพื่อหาข้อมูลที่มีประโยชน์รวมถึงโครงสร้างและข้อมูลต่างๆในด้านความปลอดภัย ซึ่งในขณะที่เราได้ข้อมูลที่มีประโยชน์ต่อการโจมตีมากขึ้น โอกาสที่เราจะโดนตรวจจับเจอก็มากขึ้นเช่นกัน
โดยที่วิธีทั่วไปและพบได้บ่อยมีดังนี้:
- DNS Enumeration: ทำการเก็บข้อมูลผ่าน Query DNS server เพื่อหา subdomains, zone transfer หรือ misconfiguration.[e.g.(Tools): dig, nslookup, และdnsenum]
- Port Scanning: ระบุพอร์ตที่ เปิด และ ปิด เพื่อหา service ที่ใช้งานได้
- TCP/UDP Scanning:
- TCP: เชื่อถือได้(ข้อมูลครบถ้วนและถูกต้อง) และ มุ่งเน้นการเชื่อมต่อ
- UDP: เร็ว แต่ขาดการเชื่อมต่อได้ง่ายและมีโอกาสที่ข้อมูลจะขาดหาย
- Using Nmap: เครื่องมือที่มีทรงพลังในการสแกน
- TCP/UDP Scanning:
Ex: nmap -sS -A -p 1-65535 <target IP>
- เป็น Command ที่สแกนแบบลับ(Stealth scan) เพื่อระบุ Operating System, Service Version ของพอร์ตทั้งหมดของเป้าหมาย
- SMB Enumeration: หาข้อมูล Shared resource, Users, Configuration ผ่าน SMB protocol[e.g.(Tools): smbclient, enum4linux, และ Metasploit]
- SMTP Enumeration: หาข้อมูลจาก Mail Servers อาทิเช่น Email address ที่ valid หรือ User Account[e.g.(Commands): VRFY และ EXPN]
- SNMP Enumeration: หาข้อมูลเกี่ยวกับเครือข่ายเครื่องมือและ Configuration ผ่าน Misconfigured ของ SNMP services[e.g.(Tools): snmpwalk และ snmp-check]
kali@kali:~$ nmap -A -T4 cybertechlabs.com

Starting Nmap 7.94 ( https://nmap.org ) at 2025-02-07 14:30 UTC
Nmap scan report for cybertechlabs.com (203.0.113.42)
Host is up (0.045s latency).
rDNS record for 203.0.113.42: host.cybertechlabs.com

PORT STATE SERVICE VERSION
22/tcp open ssh OpenSSH 8.2p1 Ubuntu 4ubuntu0.7 (Ubuntu Linux; protocol 2.0)
80/tcp open http Apache httpd 2.4.51 ((Unix))
443/tcp open https Apache httpd 2.4.51 ((Unix)) OpenSSL/1.1.1l
3306/tcp open mysql MySQL 8.0.33
8080/tcp open http-proxy Squid http proxy 4.15
8443/tcp closed https-alt
Service Info: OS: Linux; CPE: cpe:/o:linux:linux_kernel

Host script results:
|_ http-title: CyberTech Labs - Innovation & Security
|_ ssl-cert: Subject: commonName=cybertechlabs.com/organizationName=CyberTech Labs
|_ ssh-hostkey: 2048 SHA256:8f:c3:91:2b:ff:ee:b5:d1:ac:44:cc:5a:e7:1c:ef:b2 (RSA)

TRACEROUTE (using port 443/tcp)
HOP RTT ADDRESS
1 2.00 ms 192.168.1.1
2 5.50 ms 203.0.113.1
3 45.00 ms 203.0.113.42

OS and Service detection performed. Please report any incorrect results at https://nmap.org/submit/ .
Nmap done: 1 IP address (1 host up) scanned in 13.42 seconds
Codeblock 2: ตัวอย่างใช้ Command nmap บน cybertechlabs.com
ข้อได้เปรียบ:
- สามารถหาข้อเชิงลึกของเป้าหมายได้
- สามารถระบุช่องโหว่ที่เป็น Active vulnerabilities และ Misconfiguration(การตั้งค่าที่ผิดพลาด) ได้ ข้อเสียเปรียบ:
- เพิ่มโอกาสที่จะโดนตรวจจับ
- อาจทำให้ระบบแจ้งเตือนความปลอดภัยทำงานได้หากไม่ระวัง
LLM-Powered Information Gathering(การเก็บข้อมูลโดยใช้LLMs)
การเก็บข้อมูลโดยใช้ LLMs หรือ Large Language Models นั้นสามารถทำได้ทั้งแบบ Passive และ Active Information Gathering โดยที่ LLMs ที่รู้จักกันดีและมีการใช้อย่างแพร่หลายคือ ChatGPT
โดยที่วิธีทั่วไปและพบได้บ่อยมีดังนี้:
- Passive Information Gathering with LLMs: สามารถสร้าง prompt เพื่อหาข้อมูลจำพวก WHOIS information ของ target domain, Domain Status, Google Dork,หรือ Public Info
- Active Information Gathering with LLMs: เราสามารถสร้าง prompt ให้ LLMs ช่วยเหลือในการทำ Active Information Gathering ได้ เช่น การสร้าง(Generate) wordlist, etc.
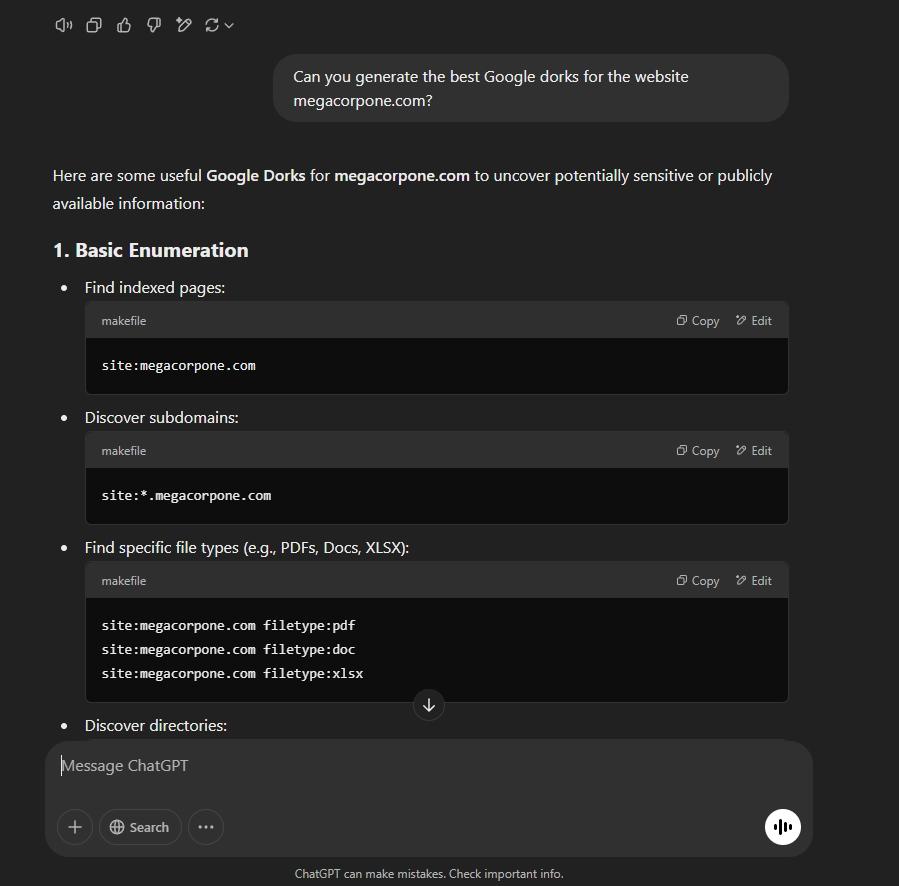 Figure 1 : ตัวอย่างการใช้ LLMs(ChatGPT) ในการทำ Passive Information Gathering
ข้อได้เปรียบ:
- ไม่มีการบุกรุก
- ลดโอกาสที่จะโดนตรวจจับ
- ง่าย และ เร็ว
Combining Every Methods(ผสมผสานการใช้งาน)
ซึ่งเมื่อเรารวมทั้ง 3 เทคนิคนี้เข้าด้วยกัน(Active, Passive, and LLM-Powered Information Gathering) นักเจาะระบบสามารถเพิ่มความเข้าใจที่มีต่อสภาพแวดล้อมของเป้าหมายได้ การรวมทุกวิธีการเข้าด้วยกันมีประสิทธิภาพมากพอในการหาช่องโหว่(Vulnerability) การตั้งค่าที่ผิดพลาด(Misconfiguration) และ ข้อมูลอื่นๆซึ่งใช้ในขั้นตอนต่อๆไปของการทดสอบการเจาะระบบ
Wrapping Up
และตอนนี้ผมคิดว่านี่เป็นเวลาและเนื้อหาอันเหมาะสมที่จะจบ Part นี้ของเรา ซึ่งใน Part นี้ก็ได้เริ่มการเจาะลึกถึงเรื่องเชิงเทคนิค: การหาและเก็บข้อมูล(Information Gathering)
ถ้าคุณผู้อ่านท่านใดที่อ่านมาถึงจุดนี้หรือไม่ถึงก็ตาม ตัวผมนั้นก็ขอขอบคุณเป็นอย่างยิ่งและก็หวังเป็นอย่างมากว่าคุณผู้อ่านจะได้พบกับสิ่งที่ตัวเองตามหาไม่มากก็น้อยใน blog หรือบทความนี้และต่อๆไป
และเช่นเดิม ใน blog หน้าจะเป็นเนื้อหาในบทต่อๆไปที่เราจะต้องเจอในคอร์ส Offsec Pen-200. Stay Tuned, Stay Safe, Try Harder!, until next time สวัสดีครับ
และสำหรับผู้ที่สนใจในใบสรุปคำสั่งและคำอธิบายเพิ่มเติม (Cheatsheet & Additional Description) สามารถดูต่อด้านล่างได้เลยครับผม 🙂🙏
Command Cheatsheet with Additional Description
CC_Passive Information Gathering(การเก็บข้อมูลโดยวิธีการทางอ้อม)
Whois(เป็นTCP service, Tools, Database เพื่อหาข้อมูลชื่อ Domain):
kali@kali:~$ whois cybertechlabs.com -h 192.168.50.251
   Domain Name: CYBERTECHLABS.COM
   Registry Domain ID: 2025123456_DOMAIN_COM-VRSN
   Registrar WHOIS Server: whois.namecheap.com
   Registrar URL: http://www.namecheap.com
   Updated Date: 2023-07-10T14:22:11Z
   Creation Date: 2016-07-10T14:22:11Z
   Registry Expiry Date: 2026-07-10T14:22:11Z
   Registrar: NameCheap, Inc.
   Registrar IANA ID: 1068
   Registrar Abuse Contact Email: abuse@namecheap.com
   Registrar Abuse Contact Phone: +1.6613102107
   Domain Status: clientTransferProhibited https://icann.org/epp#clientTransferProhibited
   Name Server: NS1.CYBERTECHLABS.COM
   Name Server: NS2.CYBERTECHLABS.COM
   DNSSEC: unsigned

Registry Registrant ID:
Registrant Name: Dr. Ethan Carter
Registrant Organization: CyberTech Labs
Registrant Street: 42 Quantum Ave Registrant
City: San Francisco
Registrant State/Province: California Registrant
Postal Code: 94105 Registrant
Country: US
Registrant Phone: +1.4156789012
Registrant Email: ethan.carter@cybertechlabs.com
.
.
Whois (Reverse lookup)ใช้ในการหาข้อมูลว่าใครเป็นผู้ให้บริการ IP address นั้นๆ :
kali@kali:~$ whois 38.100.193.70 -h 192.168.50.251
...
NetRange:       38.0.0.0 - 38.255.255.255
CIDR:           38.0.0.0/8
NetName:        COGENT-A
...
OrgName:        PSINet, Inc.
OrgId:          PSI
Address:        2450 N Street NW
City:           Washington
StateProv:      DC
PostalCode:     20037
Country:        US
RegDate:
Updated:        2015-06-04
...
CC_Active Information Gathering(การเก็บข้อมูลโดยวิธีการทางตรง)
- DNS Enumeration DNS เป็นตัวแจกแจง Database ซึ่งแปลงจากชื่อ Domain เป็น IP addresses เพื่อให้อินเตอร์เน็ตใช้งานได้
ประเภทโดยทั่วไปของ DNS record:
- NS: ระบุชื่อเซิร์ฟเวอร์ที่มีสิทธิ์ใน Domain
- A: ชี้(Map) hostname ไปหา IPv4 address
- AAAA: ชี้(Map) hostname ไปหา IPv6 address
- MX: ระบุเซิร์ฟเวอร์ Mail เพื่อจัดการกับเมล
- PTR: ใช้เพื่อ Reverse lookup (IP to Domain)
- CNAME: สร้างชื่อสมมุติ(Nickname) ให้ hostname
- TXT: ใช้แอบเก็บข้อมูล(arbitrary) ส่วนมากใช้ในขั้นตอนยืนยัน
Host(ใช้ในการหาข้อมูล A record):
kali@kali:~$ host www.megacorpone.com
www.megacorpone.com has address 149.56.244.87
สามารถใช้ -t mx เพื่อหาข้อมูล MX และ TXT record ได้:
kali@kali:~$ host -t mx megacorpone.com
megacorpone.com mail is handled by 10 fb.mail.gandi.net.
megacorpone.com mail is handled by 20 spool.mail.gandi.net.
megacorpone.com mail is handled by 50 mail.megacorpone.com.
megacorpone.com mail is handled by 60 mail2.megacorpone.com.
DNSRecon(เป็น Advanced DNS Enumeration script ซึ่งเขียนโดย Python): สามารถใช้ -d เพื่อระบุชื่อ Domain และ -t เพื่อระบุประเภทของ Enumeration
kali@kali:~$ dnsrecon -d megacorpone.com -t std
[*] std: Performing General Enumeration against: megacorpone.com...
[-] DNSSEC is not configured for megacorpone.com
[*]      SOA ns1.megacorpone.com 51.79.37.18
[*]      NS ns1.megacorpone.com 51.79.37.18
[*]      NS ns3.megacorpone.com 66.70.207.180
[*]      NS ns2.megacorpone.com 51.222.39.63
[*]      MX mail.megacorpone.com 51.222.169.212
[*]      MX spool.mail.gandi.net 217.70.178.1
[*]      MX fb.mail.gandi.net 217.70.178.217
[*]      MX fb.mail.gandi.net 217.70.178.216
[*]      MX fb.mail.gandi.net 217.70.178.215
[*]      MX mail2.megacorpone.com 51.222.169.213
[*]      TXT megacorpone.com Try Harder
[*]      TXT megacorpone.com google-site-verification=U7B_b0HNeBtY4qYGQZNsEYXfCJ32hMNV3GtC0wWq5pA
[*] Enumerating SRV Records
[+] 0 Records Found
DNSEnum(อีกหนึ่งเครื่องมือที่ได้รับความนิยมเพื่อ Automate DNS Enumeration):
kali@kali:~$ dnsenum megacorpone.com
...
dnsenum VERSION:1.2.6

-----   megacorpone.com   -----

...

Brute forcing with /usr/share/dnsenum/dns.txt:
_______________________________________________

admin.megacorpone.com.                   5        IN    A        51.222.169.208
beta.megacorpone.com.                    5        IN    A        51.222.169.209
fs1.megacorpone.com.                     5        IN    A        51.222.169.210
intranet.megacorpone.com.                5        IN    A        51.222.169.211
mail.megacorpone.com.                    5        IN    A        51.222.169.212
mail2.megacorpone.com.                   5        IN    A        51.222.169.213
ns1.megacorpone.com.                     5        IN    A        51.79.37.18
.
.
NSLookup(DNS Enumeration สำหรับ Windows):
C:\Users\student>nslookup mail.megacorptwo.com
DNS request timed out.
    timeout was 2 seconds.
Server:  UnKnown
Address:  192.168.50.151

Name:    mail.megacorptwo.com
Address:  192.168.50.154
สามารถระบุ Type เพื่อหา Record ตามประเภทที่ต้องการได้ อาทิเช่น TXT:
C:\Users\student>nslookup -type=TXT info.megacorptwo.com 192.168.50.151
Server:  UnKnown
Address:  192.168.50.151

info.megacorptwo.com    text = "greetings from the TXT record body"
Port Scan
Netcat: TCP:
$ nc -nv -z -w 1 192.168.210.151 1-1000
(UNKNOWN) [192.168.210.151] 636 (ldaps) open
(UNKNOWN) [192.168.210.151] 593 (?) open
(UNKNOWN) [192.168.210.151] 464 (kpasswd) open
UDP:
$ nc -nv -u -z -w 1 192.168.210.151 100-200
(UNKNOWN) [192.168.210.151] 161 (snmp) open
(UNKNOWN) [192.168.210.151] 138 (netbios-dgm) open
(UNKNO
WN) [192.168.210.151] 137 (netbios-ns) open
NMap:
- TCP SYN: sudo nmap -sS 192.168.210.151
- TCP Connect: sudo nmap -sT 192.168.210.151
- UDP: sudo nmap -sU 192.168.210.151
- UDP SYN: sudo nmap -sU -sS 192.168.210.151
- Ping Sweep: sudo nmap -sn 192.168.210.151
- OS Discover: sudo nmap -O 192.168.210.151 --osscan-guess
- Scripting: sudo nmap --script http-headers 192.168.210.151
- Service Discovery: sudo nmap -sV -p 80 192.168.210.151 | sudo nmap -A -p 80 192.168.210.151
- Path of the scripts: ls -1 /usr/share/nmap/scripts/
- Some interesting scripts: --script http-enum | --script vuln
Powershell(สามารถใช้ Test-NetConnection หรือ tnc ก็ได้):
PS C:\Users\student> Test-NetConnection -Port 445 192.168.50.151

ComputerName     : 192.168.50.151
RemoteAddress    : 192.168.50.151
RemotePort       : 445
InterfaceAlias   : Ethernet0
SourceAddress    : 192.168.50.152
TcpTestSucceeded : True
สแกน Port ที่เปิด โดยระบุ IP address:
PS C:\Users\student> 1..65535 | % {if ((New-Object Net.Sockets.TcpClient).BeginConnect("172.16.231.10", $_, $null, $null).AsyncWaitHandle.WaitOne(50, $false)) { "TCP port $_ is open"} } 2>$null
สแกน Port ที่เปิด โดยระบุ IP address ที่เก็บไว้ภายในไฟล์ Text:
PS C:\Users\student> Get-Content "ips.txt" | ForEach-Object { $ip = $_; 1..65535 | ForEach-Object { if ((New-Object Net.Sockets.TcpClient).BeginConnect($ip, $_, $null, $null).AsyncWaitHandle.WaitOne(50, $false)) { "TCP port $_ is open on $ip" } } } 2>$null
สแกน Port ที่เปิด โดยระบุ IP address ที่เก็บไว้ภายในไฟล์ Text พร้อมๆกัน(Simultaneously):
PS C:\Users\student> Get-Content "ips.txt" | ForEach-Object { $ip = $_; 1..65535 | ForEach-Object { Start-Job -ScriptBlock { param($ip, $port) if ((New-Object Net.Sockets.TcpClient).BeginConnect($ip, $port, $null, $null).AsyncWaitHandle.WaitOne(50, $false)) { "TCP port $port is open on $ip" } } -ArgumentList $ip, $_ } } | Wait-Job | Receive-Job | Select-Object -ExpandProperty Output 2>$null
PowerSploit’s Invoke-Portscan script:
PS C:\Users\student> . .\Invoke-Portscan.ps1
PS C:\Users\student> Invoke-Portscan -HostFile ips.txt -Ports 1-65535 -SkipDiscovery
SMB
NetBIOS ทำงานบน TCP Port 139 และ อีกหลาย UDP Port ในขณะที่ SMB ใช้ TCP Port 445 ซึ่งทั่ง 2 นั้นแยก Protocol กัน
โดยที่ NetBIOS ทำให้เครือข่ายสื่อสารแบบ local ทำงานผ่าน SMB ได้ แต่ยังไงก็ตาม NetBios ที่ทำงานบน TCP (NBT) จะถูกเปิดให้ทำงานได้เพื่อการ enumeration ทั้ง 2 service โดยสามารถเก็บข้อมูลได้ผ่าน nmap
kali@kali:~$ nmap -v -p 139,445 192.168.50.1-254
# Nmap 7.92 scan initiated Thu Mar 17 06:03:12 2022 as: nmap -v -p 139,445 -oG smb.txt 192.168.50.1-254
# Ports scanned: TCP(2;139,445) UDP(0;) SCTP(0;) PROTOCOLS(0;)
Host: 192.168.50.1 ()   Status: Down
...
Host: 192.168.50.21 ()  Status: Up
Host: 192.168.50.21 ()  Ports: 139/closed/tcp//netbios-ssn///, 445/closed/tcp//microsoft-ds///
...
Host: 192.168.50.217 () Status: Up
Host: 192.168.50.217 () Ports: 139/closed/tcp//netbios-ssn///, 445/closed/tcp//microsoft-ds///
# Nmap done at Thu Mar 17 06:03:18 2022 -- 254 IP addresses (15 hosts up) scanned in 6.17 seconds
NetBIOS with NBTScan:
kali@kali:~$ sudo nbtscan -r 192.168.50.0/24
Doing NBT name scan for addresses from 192.168.50.0/24

IP address       NetBIOS Name     Server    User             MAC address
------------------------------------------------------------------------------
192.168.50.124   SAMBA            <server>  SAMBA            00:00:00:00:00:00
192.168.50.134   SAMBAWEB         <server>  SAMBAWEB         00:00:00:00:00:00
...
Nmap:
kali@kali:~$ nmap -v -p 139,445 --script smb-os-discovery 192.168.50.152
...
PORT    STATE SERVICE      REASON
139/tcp open  netbios-ssn  syn-ack
445/tcp open  microsoft-ds syn-ack

Host script results:
| smb-os-discovery:
|   OS: Windows 10 Pro 22000 (Windows 10 Pro 6.3)
|   OS CPE: cpe:/o:microsoft:windows_10::-
|   Computer name: client01
|   NetBIOS computer name: CLIENT01\x00
|   Domain name: megacorptwo.com
|   Forest name: megacorptwo.com
|   FQDN: client01.megacorptwo.com
|_  System time: 2022-03-17T11:54:20-07:00
...
Powershell(ใช้ Enumerate SMB shares ใน Windows เพื่อหา domains, resources, และ อุปกรณ์ที่อยู่ภายใต้ host เดียวกัน):
C:\Users\student>net view \\dc01 /all
Shared resources at \\dc01

Share name  Type  Used as  Comment

-------------------------------------------------------------------------------
ADMIN$      Disk           Remote Admin
C$          Disk           Default share
IPC$        IPC            Remote IPC
NETLOGON    Disk           Logon server share
SYSVOL      Disk           Logon server share
The command completed successfully.
Listing 44 - Running 'net view' to list remote shares

By providing the /all keyword, we can list the administrative shares ending with the dollar sign.
SMTP(Mail Server):
kali@kali:~$ nc -nv 192.168.50.8 25
(UNKNOWN) [192.168.50.8] 25 (smtp) open
220 mail ESMTP Postfix (Ubuntu)
VRFY root
252 2.0.0 root
VRFY idontexist
550 5.1.1 <idontexist>: Recipient address rejected: User unknown in local recipient table
Python(เราสามารถใช้ Python script เพื่อหาข้อมูลใน SMTP [ตัวอย่างสำหรับ VRFY]):
->Example of Python script:
#!/usr/bin/python

import socket
import sys

if len(sys.argv) != 3:
        print("Usage: vrfy.py <username> <target_ip>")
        sys.exit(0)

# Create a Socket
s = socket.socket(socket.AF_INET, socket.SOCK_STREAM)

# Connect to the Server
ip = sys.argv[2]
connect = s.connect((ip,25))

# Receive the banner
banner = s.recv(1024)

print(banner)

# VRFY a user
user = (sys.argv[1]).encode()
s.send(b'VRFY ' + user + b'\r\n')
result = s.recv(1024)

print(result)

# Close the socket
s.close()
ตัวอย่างการใช้งาน:
kali@kali:~/Desktop$ python3 smtp.py root 192.168.50.8
b'220 mail ESMTP Postfix (Ubuntu)\r\n'
b'252 2.0.0 root\r\n'
Powershell:
PS C:\Users\student> Test-NetConnection -Port 25 192.168.50.8

ComputerName     : 192.168.50.8
RemoteAddress    : 192.168.50.8
RemotePort       : 25
InterfaceAlias   : Ethernet0
SourceAddress    : 192.168.50.152
TcpTestSucceeded : True
Telnet(เราสามารถใช้ Telnet ในการเก็บข้อมูลผ่าน Mail Service ได้ แต่ไม่เต็มประสิทธิภาพเนื่องด้วย Telnet ไม่สามารถที่จะโต้ตอบ(interact) กับ SMTP service ได้):
->แต่ยังไงก็ตาม เราสามารถเปิดการใช้งาน และ ติดตั้ง Telnet ของ Microsoft version ได้:
PS C:\Windows\system32> dism /online /Enable-Feature /FeatureName:TelnetClient
...
C:\Windows\system32>telnet 192.168.50.8 25
220 mail ESMTP Postfix (Ubuntu)
VRFY goofy
550 5.1.1 <goofy>: Recipient address rejected: User unknown in local recipient table
VRFY root
252 2.0.0 root
SNMP(SNMP ทำงานบน Stateless UDP บน port 161):
Windows SNMP MIB values:
| 1.3.6.1.2.1.25.1.6.0 | System Processes |
| 1.3.6.1.2.1.25.4.2.1.2 | Running Programs |
| 1.3.6.1.2.1.25.4.2.1.4 | Processes Path |
| 1.3.6.1.2.1.25.2.3.1.4 | Storage Units |
| 1.3.6.1.2.1.25.6.3.1.2 | Software Name |
| 1.3.6.1.4.1.77.1.2.25 | User Accounts |
| 1.3.6.1.2.1.6.13.1.3 | TCP Local Ports |
OneSixtyOne:
kali@kali:~$ echo public > community
kali@kali:~$ echo private >> community
kali@kali:~$ echo manager >> community

kali@kali:~$ for ip in $(seq 1 254); do echo 192.168.50.$ip; done > ips

kali@kali:~$ onesixtyone -c community -i ips
Scanning 254 hosts, 3 communities
192.168.50.151 [public] Hardware: Intel64 Family 6 Model 79 Stepping 1 AT/AT COMPATIBLE - Software: Windows Version 6.3 (Build 17763 Multiprocessor Free)
...
SNMPWalk:
-> Oa option จะทำการแปลง hexadecimal string เป็น ASCII โดยอัตโนมัติ:
kali@kali:~$ snmpwalk -c public -v1 -t 10 192.168.50.151
iso.3.6.1.2.1.1.1.0 = STRING: "Hardware: Intel64 Family 6 Model 79 Stepping 1 AT/AT COMPATIBLE - Software: Windows Version 6.3 (Build 17763 Multiprocessor Free)"
iso.3.6.1.2.1.1.2.0 = OID: iso.3.6.1.4.1.311.1.1.3.1.3
iso.3.6.1.2.1.1.3.0 = Timeticks: (78235) 0:13:02.35
iso.3.6.1.2.1.1.4.0 = STRING: "admin@megacorptwo.com"
iso.3.6.1.2.1.1.5.0 = STRING: "dc01.megacorptwo.com"
iso.3.6.1.2.1.1.6.0 = ""
iso.3.6.1.2.1.1.7.0 = INTEGER: 79
iso.3.6.1.2.1.2.1.0 = INTEGER: 24
...
-> ตัวอย่างเมื่อ Enumerate Windows User[1.3.6.1.4.1.77.1.2.25 | User Accounts]:
kali@kali:~$ snmpwalk -c public -v1 192.168.50.151 1.3.6.1.4.1.77.1.2.25
iso.3.6.1.4.1.77.1.2.25.1.1.5.71.117.101.115.116 = STRING: "Guest"
iso.3.6.1.4.1.77.1.2.25.1.1.6.107.114.98.116.103.116 = STRING: "krbtgt"
iso.3.6.1.4.1.77.1.2.25.1.1.7.115.116.117.100.101.110.116 = STRING: "student"
iso.3.6.1.4.1.77.1.2.25.1.1.13.65.100.109.105.110.105.115.116.114.97.116.111.114 = STRING: "Administrator"
SNMPBulkWalk(เหมือนกับ SNMPWalk แต่เร็วกว่า):
kali@kali:~$ snmpbulkwalk -c public -v1 192.168.50.151 1.3.6.1.2.1.25.4.2.1.2
ก็จบลงไปจริงๆแล้วครับสำหรับ blog นี้ ตัวผมหวังเป็นอย่างยิ่งว่าคุณผู้อ่านทุกท่านจะได้ประโยชน์กลับไปไม่มากก็น้อย แล้วพบกันใหม่ใน blog หน้า See you soon ครับผม สวัสดีครับ 🙂🙏

อ่าน Part 3 : Vulnerability Scanning & Basic Web Attacks
อ่าน Part 4 : SQLi & Windows Client-Side Attacks